Creating Wallet

In this chapter, we will learn how to create Ethereum wallet. To create a new wallet, enter a password of your choice and then click on the “Create New Wallet” button. When you do so, a Wallet would be created. A digital wallet is essentially the generation of a public/private key pair that you need to store in a safe place. The wallet creation results in the following screen −

Create New Wallet

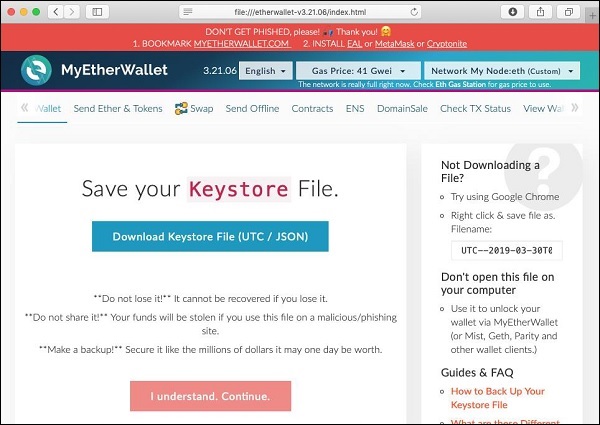
Click on the “Download Keystore File (UTC / JSON)” button to save the generated keys. Now, click on the “I understand. Continue” button. Your private key will appear on the screen as seen in the screenshot below −

Download KeyStore

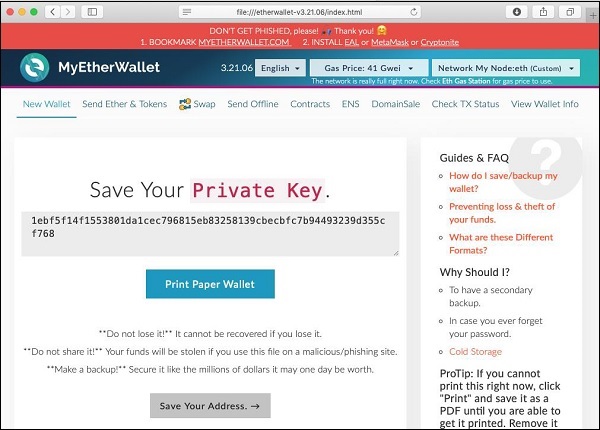
Click on the “Print Paper Wallet” button to keep a physical record of your wallet’s private key. You will need this later for unlocking the wallet. You will see the following screen. Do not lose this output.

Print Paper Wallet

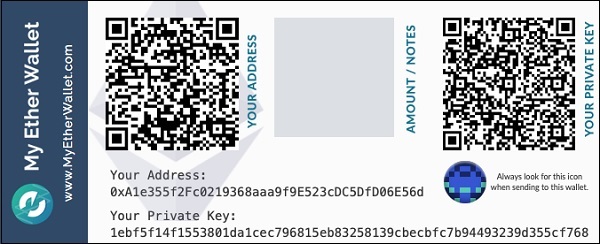
To unlock your wallet, click on the “Save Your Address” button. You will see the following screen.

Unlock Your Wallet

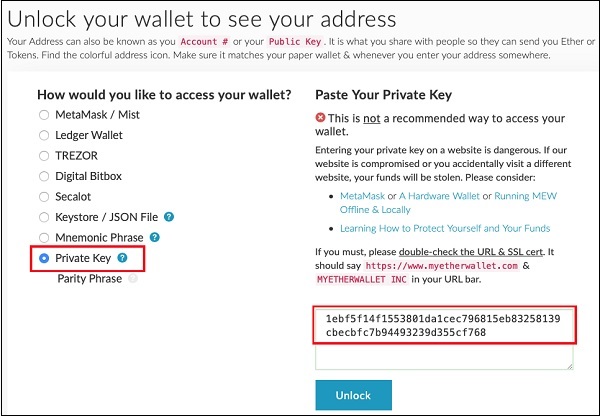
The wallet can be unlocked using the Private Key option as highlighted in the above screen. Cut-n-paste the private key from the previous screenshot and click the Unlock button. Your wallet will be unlocked and you will see a message appear at the bottom of the screen. As the wallet does not contain anything as of now, unlocking the wallet is not really useful to us at this point.

Similar Posts

  • Solidity for Contract Writing

    Solidity is an object-oriented language especially developed for contract writing. It is a high-level language, which inherits traits from C++, Python, and JavaScript. The Solidity compiler compiles your source code into bytecode that runs on Ethereum Virtual Machine (EVM). For quick understanding of the Solidity syntax, look at the sample code in the IDE.pragma solidity…

  • Limitations of Remix

    The Remix IDE that you have used so far is good enough for development and initial testing of your contract. For real-life contracts, you need to test your functionality against various parameters. Remix cannot create real (non-test) user accounts to transfer funds between them. You have no control over the configuration of the Blockchain created…

  • A Quick Walkthrough

    We will now briefly understand what is available on the Ganache desktop. On the Desktop, at the top we have several menu options out of which a few are of immediate relevance to us. The menu bar is highlighted in the screenshot below − Clicking on the TRANSACTIONS menu shows all the transactions performed so far. You…

  • Deploying the Contract

    In this chapter, we will learn how to deploy contract on Ethereum. Click on the Run menu option to deploy the contract. The following screen will appear. The contract name is shown in the highlighted list box. Below this, you will notice the Deploy button, click on it to deploy the contract. The contract will be deployed…