Interacting with the Contract

When you click the deployed contract, you will see the various public methods provided by the contract. This is shown in the screenshot below.

Deploy Public Methods

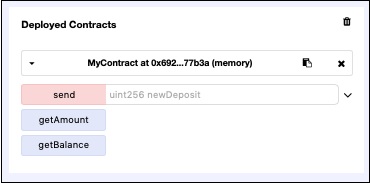
The first method send contains an edit box in front of it. Here, you will type the parameters required by the contract method. The other two methods do not take any parameters.

Sending Money

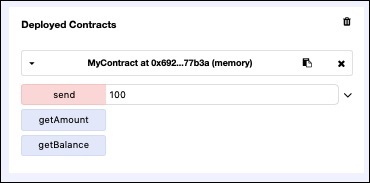
Now, enter some amount such as 100 in front of the send function seen in the contract window. Click the send button. This will execute the contract send method, reducing the value of the contract value field and increasing the value of the amount field.

Sending Money

Examining Contract Value

The previous send money action has reduced the contract value by 100. You can now examine this by invoking the getBalance method of the contract. You will see the output when you click on the getBalance button as shown in the screenshot below −

Examining Contract Value

The contract value is now reduced to 900.

Examining Collected Amount

In this section, we will examine the amount of money collected so far on this contract. For this, click on the getAmount button. The following screen will appear.

Examining Collected Amount

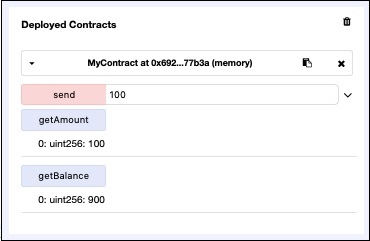
The amount field value has changed from 0 to 100.

Try a few send operations and examine the contract value and the amount fields to conclude that the deployed contract is executing as expected.

Similar Posts

  • Creating Contract Users

    In this chapter, we will learn the creation of contract users on Ethereum. To create a user for our published contract, we will create another MyEtherWallet client attached to the same Ganache Blockchain that you have been using in the previous steps. Go to the MyEtherWallet screen and create a new wallet. Click on the contracts menu and select the “Interact with…

  • Creating Wallet

    In this chapter, we will learn how to create Ethereum wallet. To create a new wallet, enter a password of your choice and then click on the “Create New Wallet” button. When you do so, a Wallet would be created. A digital wallet is essentially the generation of a public/private key pair that you need…

  • Limitations of Remix

    The Remix IDE that you have used so far is good enough for development and initial testing of your contract. For real-life contracts, you need to test your functionality against various parameters. Remix cannot create real (non-test) user accounts to transfer funds between them. You have no control over the configuration of the Blockchain created…

  • Smart Contracts

    There are several tools available to develop and test contracts. One of the simplest tools is provided on the official Ethereum site itself. The tool is called Remix, we will use this for our contract development. Remix for Contract Development Open the Remix IDE by typing in the following URL in your browser.https://remix.ethereum.org The following screen…

  • Deploying Contract

    To deploy the contract, select the Contracts menu option as shown in the screenshot below − You will need to enter the contract’s bytecode on this screen. Remember, when you compile your Solidity contract code, it generated a bytecode that runs on EVM. You will now need to obtain this bytecode from Remix IDE. Go to the Remix…